Woodworm & Sawdust - August 23, 2018
Despite having to spend time driving to Leroy Merlin again (about and hour's round trip - and the time in store) I actually got quite a lot done today.
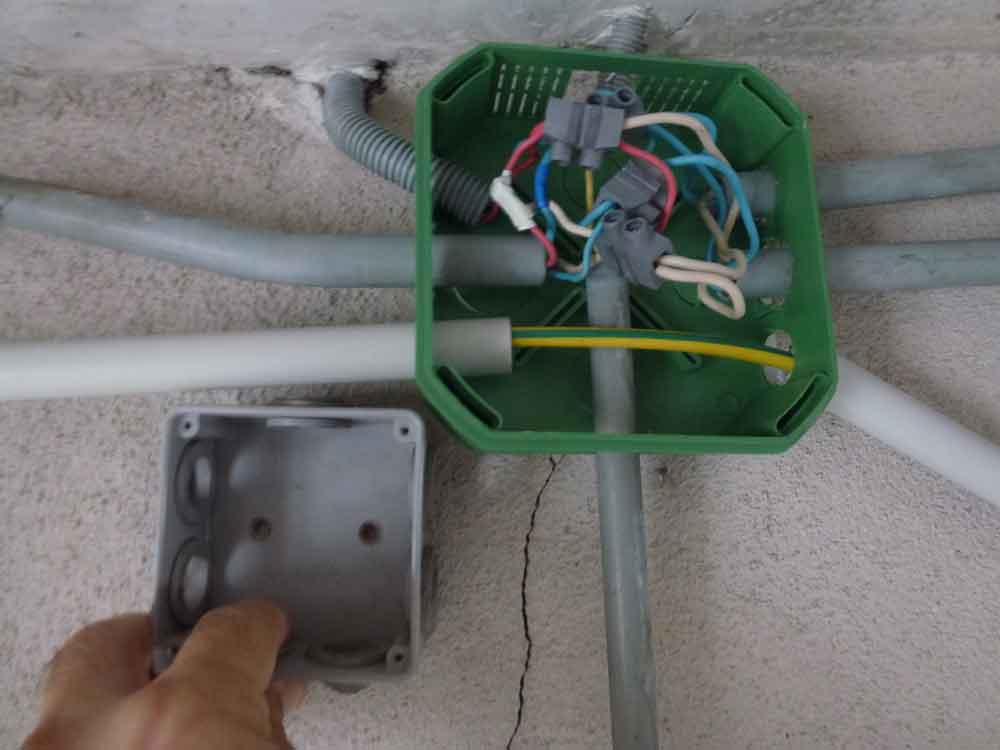
First job was to continue routing the earth wire now that I had more of the 20 mm conduit. This meant removing and existing junction box and replacing it with a new larger one. Tim had suggested taking a photo of the internals so that I could reconnect everything properly - good advice, except the internals were so chaotic and cramped, there would be little chance of making head or tail of a photo. So, out with pen and paper and carefully noting what connected to what - I tell you, I now have a lot more respect for electricians and the patience they must have; there's no jumping in feet first with this type of job.

Though I didn't take a before and after photo, you get some idea of how cramped the original box was from the image above - the only addition is the earth-wire running through the bottom of the new box. Its all a bit wonky as neither the box nor the earth conduit are properly secured yet.
I glued the back plate of the junction box to the wall so, to allow that to set, I moved on to continuing to dig out the 'flower' bed on the roof of the garage - I'm removing the soil to allow me to weatherproof the entire roof. I filled 14 more sacks (to add to the 6 already filled) and there's still more to dig - but I'm out of sacks, so I'll have to continue tomorrow.
Most of the bed was filled with a variety of lemon-balm. This fella had also insinuated himself:

Looks fairly innocuous - but look at his root!..

With the garage roof stalled, I decided to start prepping the cellar ceiling (joists and floorboards) for woodworm treatment. I started by simply brushing away the cobwebs and dust to allow me to paint the treatment on to a clean surface. Noticing that some of the dust was excessive I decided to tap away at some of the beams to remove dead wood. As the extent of deadwood started to become apparent, the tapping soon became hammering aggressively with the claw end of a claw-hammer.
Again, I didn't take before shots but, as I only managed to 'prep' about a third of the ceiling area, here's and example of what many of the joists looked like before I set to work:

And here's what they tend to look like now:

Some of it fell away in huge chunks as shown here:

The good news is that the 'worm' only attacks the soft sapwood outer layer and the heart of the wood is untouched.
The bad news is that as these are floor joists and the floorboards rest on the sapwood element - which is eaten away. I think things will be fine for now and I think we will be able to avoid having to have new joists put in, but a project for next year will probably be to wedge some good wood between the joist hearts and the floorboards - to provide the required support.
I did the sensible thing and wore a filter mask when doing this job. Where I was less sensible was in not wearing the 'paper' boiler suit I have here. I was covered in sawdust when I resurfaced. That said, the boiler suit would probably needed throwing at the end of the day and so I can now wear it when I continue the job - and then throw it.
So, all in all, a productive day - but no jobs finished yet. Tomorrow, I'll be leaving the earth wire alone as I give the junction box glue another day to set, but I will get some rubble sacks to allow me to continue with the garage roof and then, towards the end of the day, since it will be filthy work, I'll do some more joist hammering in the cellar.
First job was to continue routing the earth wire now that I had more of the 20 mm conduit. This meant removing and existing junction box and replacing it with a new larger one. Tim had suggested taking a photo of the internals so that I could reconnect everything properly - good advice, except the internals were so chaotic and cramped, there would be little chance of making head or tail of a photo. So, out with pen and paper and carefully noting what connected to what - I tell you, I now have a lot more respect for electricians and the patience they must have; there's no jumping in feet first with this type of job.
Though I didn't take a before and after photo, you get some idea of how cramped the original box was from the image above - the only addition is the earth-wire running through the bottom of the new box. Its all a bit wonky as neither the box nor the earth conduit are properly secured yet.
I glued the back plate of the junction box to the wall so, to allow that to set, I moved on to continuing to dig out the 'flower' bed on the roof of the garage - I'm removing the soil to allow me to weatherproof the entire roof. I filled 14 more sacks (to add to the 6 already filled) and there's still more to dig - but I'm out of sacks, so I'll have to continue tomorrow.
Most of the bed was filled with a variety of lemon-balm. This fella had also insinuated himself:

Looks fairly innocuous - but look at his root!..

With the garage roof stalled, I decided to start prepping the cellar ceiling (joists and floorboards) for woodworm treatment. I started by simply brushing away the cobwebs and dust to allow me to paint the treatment on to a clean surface. Noticing that some of the dust was excessive I decided to tap away at some of the beams to remove dead wood. As the extent of deadwood started to become apparent, the tapping soon became hammering aggressively with the claw end of a claw-hammer.
Again, I didn't take before shots but, as I only managed to 'prep' about a third of the ceiling area, here's and example of what many of the joists looked like before I set to work:

And here's what they tend to look like now:

Some of it fell away in huge chunks as shown here:

The good news is that the 'worm' only attacks the soft sapwood outer layer and the heart of the wood is untouched.
The bad news is that as these are floor joists and the floorboards rest on the sapwood element - which is eaten away. I think things will be fine for now and I think we will be able to avoid having to have new joists put in, but a project for next year will probably be to wedge some good wood between the joist hearts and the floorboards - to provide the required support.
I did the sensible thing and wore a filter mask when doing this job. Where I was less sensible was in not wearing the 'paper' boiler suit I have here. I was covered in sawdust when I resurfaced. That said, the boiler suit would probably needed throwing at the end of the day and so I can now wear it when I continue the job - and then throw it.
So, all in all, a productive day - but no jobs finished yet. Tomorrow, I'll be leaving the earth wire alone as I give the junction box glue another day to set, but I will get some rubble sacks to allow me to continue with the garage roof and then, towards the end of the day, since it will be filthy work, I'll do some more joist hammering in the cellar.


This comment has been removed by a blog administrator.
ReplyDeleteThis comment has been removed by a blog administrator.
ReplyDelete